Search engine marketing offers the potential for impressive returns and rapid results, making it a valuable tool for selling parts online. A well-made campaign can be up and running in just a few weeks, delivering returns of 2-5 times every dollar you invest. It can be daunting to get started, but fear not—Microsoft and Google have set up their ad platforms to be incredibly user-friendly.
Once you’ve prepared your landing pages, done your keyword research, and established a budget strategy, setting up your search ads is a matter of five straightforward steps.
How to Set Up Google Search Ads
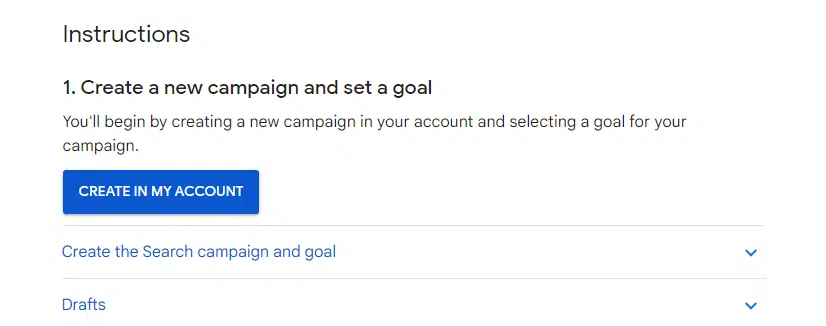
First, you’ll need to navigate to the Google Ads page and create an account. This is as simple as inputting your email and choosing to create a new campaign, which will bring you to this page:
Step 1. Input Your Business Information
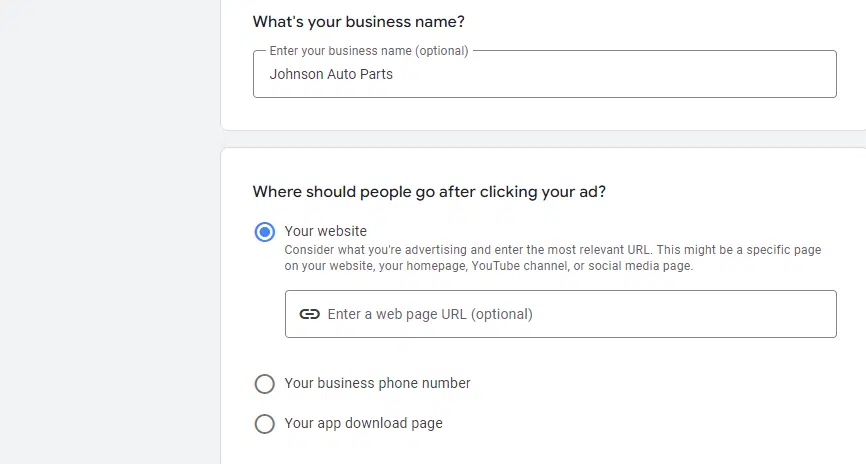
After you select “Create in My Account,” you’ll proceed to the first step in creating your Google Ads. Here, you’ll input your business name – we’ve written “Johnson Auto Parts” as a placeholder, but you can also proceed and get a feel for the system without putting in any business information here.
Besides inputting your business information, you’ll also need to select a destination for your ads. An auto parts eCommerce shop would almost always want to choose “Your website,” and the URL will go to your landing page. Depending on your goals, this could link to your home page, a product page, or a purpose-made landing page geared toward conversions.
Step 2. Choose Your Goal and Campaign Type
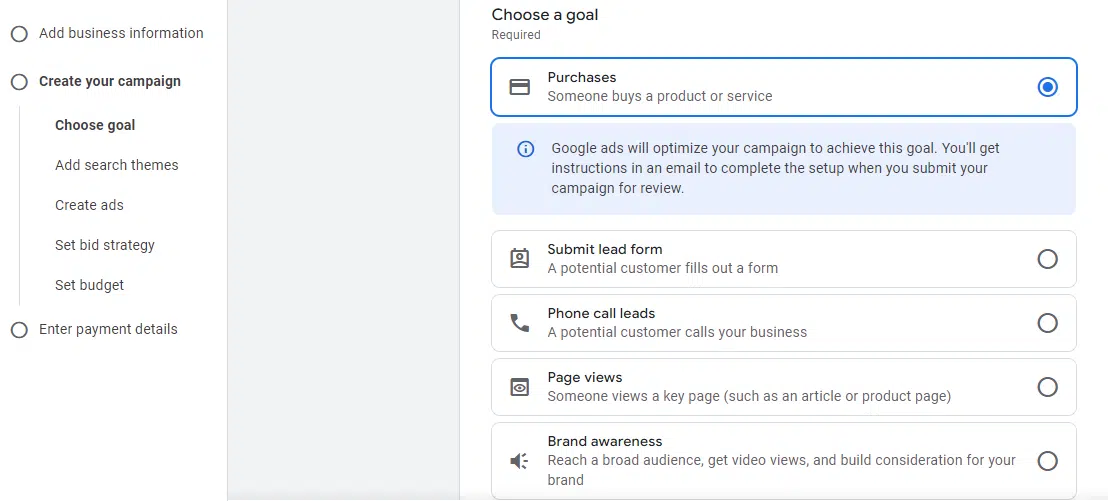
Google will help you set up your targeting by asking you to choose a goal for your campaign, such as completing purchases, getting page views, or submitting a form.
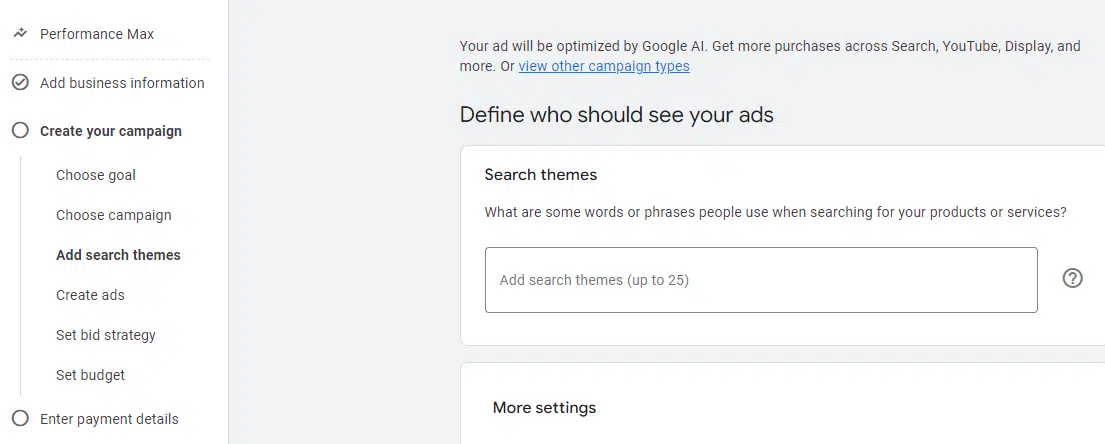
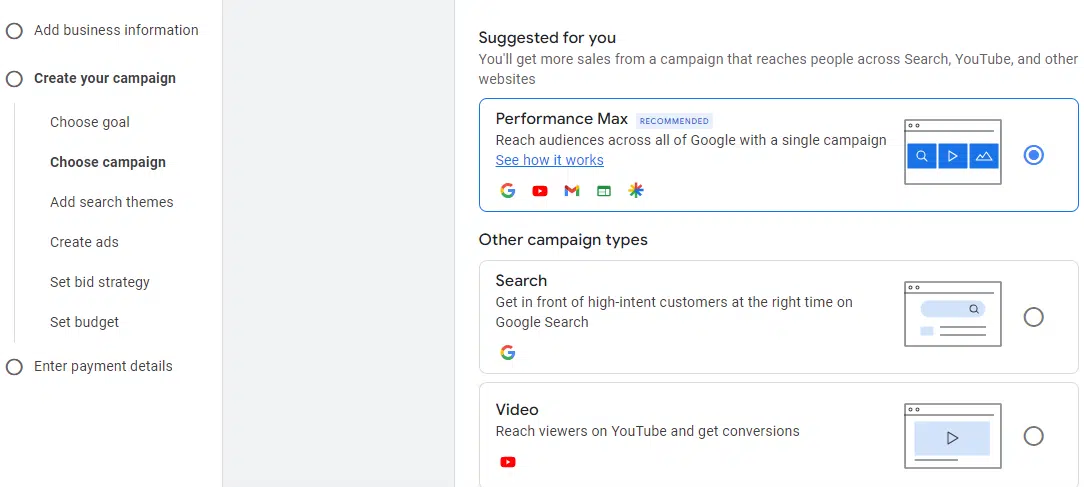
There’s a hidden step between “Choose Goal” and “Add Search Themes.” Google starts new users up on semi-automated Performance Max campaigns by default, where the algorithm uses a handful of themes to select your keywords. While Performance Max can be a good choice, you should select “View other campaign types” if you’d prefer to set up a Search campaign with manually-selected keywords.
Step 3. Select Keywords and Locations
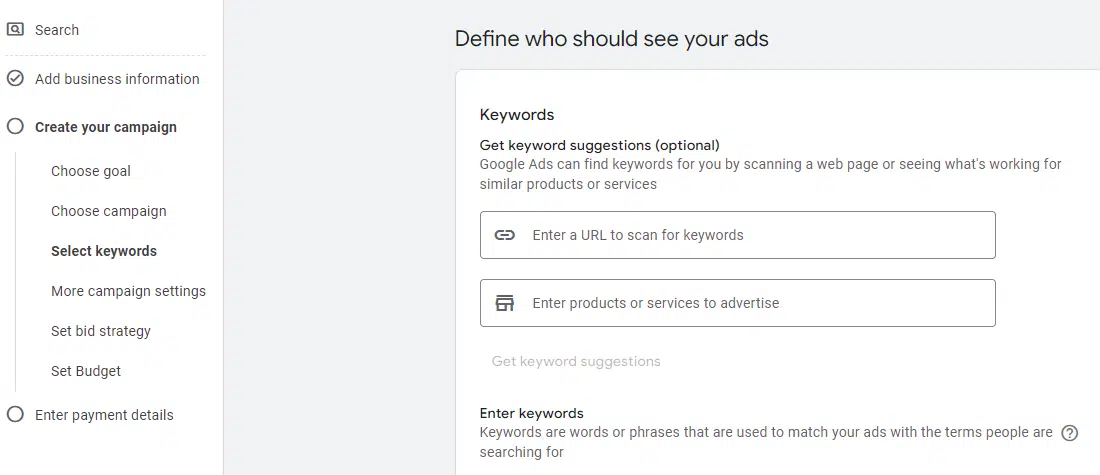
After choosing to start a new Google Search campaign, you can set your keywords. You can enter them fully manually in the lower part of the screen, but you can also get recommendations by running your own page or competitor URLs through the keyword suggestion tool.
Step 4. Create Your Ads
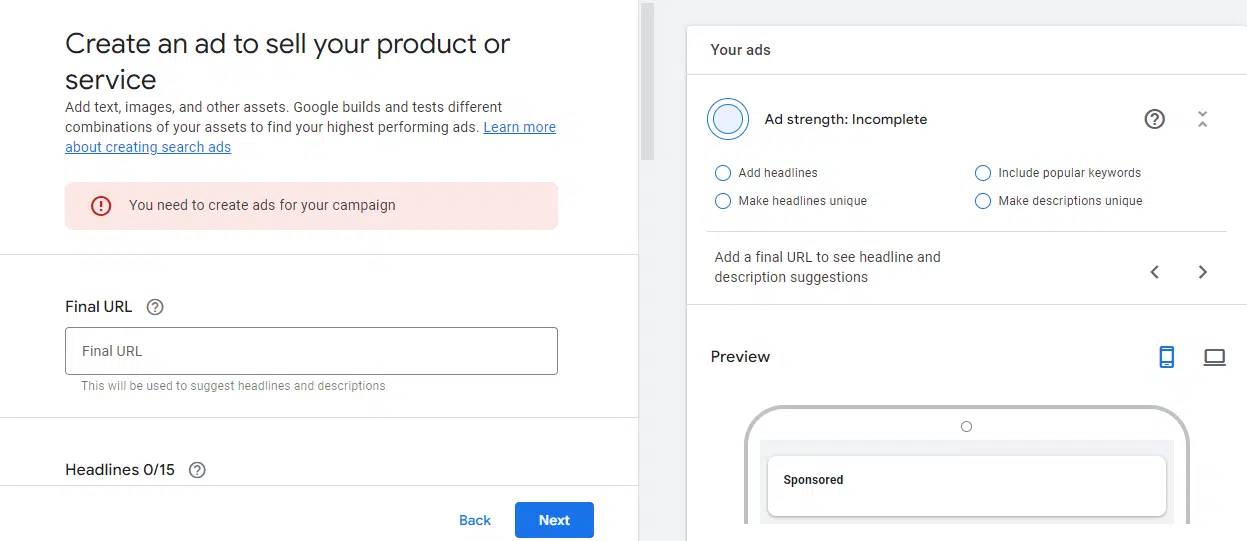
This part of the Google Ad covers what people see when searching one of your terms when your bid wins. This covers the headline, description, URL, and images that will show up on the search engine results page.
Further down the page, you’ll have to input a few logos and headlines that are required for your ads. There are also optional elements that can improve the effectiveness of your ads, such as optional sitelinks, videos, and calls to action. The most specific requirement is for a landscape image, which must have at least a 1.9:1 aspect ratio.
In most cases, you only need to provide 1-2 images or examples of the required text. However, it’s advisable to add multiple versions. Google will use that information to automatically generate numerous different ads and promote the best-performing versions, maximizing your results.
Step 5. Set Your Budget, Bid Strategy, and Payment Details
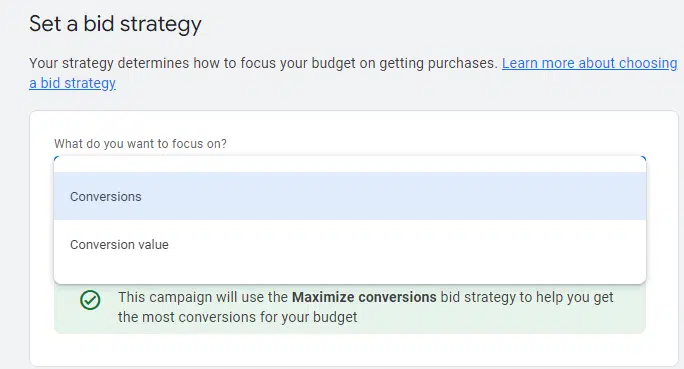
The last remaining step is choosing your bid strategy and budget. Google offers two bid strategies: conversion-focused and conversion value-focused, each with an optional goal. Conversions let you set a cost-per-action target, while conversion value lets you set a ROAS (return on ad spend) target.
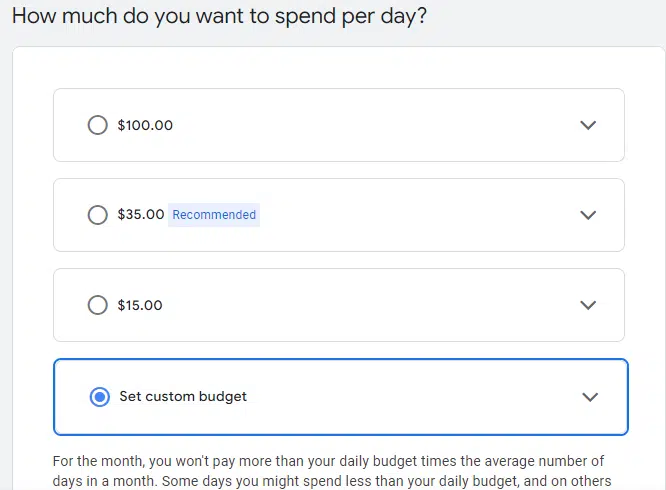
Finally, you set your daily budget. Google’s daily budgets aren’t strict, and on some days you may pay much more or much less; however, it will work out to the average over the span of a month. You can choose any of the presets or select a custom budget if they’re not suitable for your spending goals.
After setting your budget and providing your payment details, your Google Search campaign is ready for launch.
Setting Up Microsoft Ads (Formerly Known as Bing Ads)
Microsoft Ads are broadly similar to Google Ads, although there are some key differences. While Google Ads remains much more popular, Bing Ads offers some unique features and can sometimes be a more economical choice. You can create your campaigns in five steps:
Step 1. Create a Microsoft Advertising Account
First, you’ll need to create a Microsoft Advertising account.
- Visit the Microsoft Advertising site: Go to the Microsoft Advertising website and click on “Sign up now.”
- Sign up: You can sign up with a Microsoft account (like Hotmail, Outlook.com, or Microsoft 365 account). If you don’t have a Microsoft account, you’ll need to create one.
Step 2. Import a Campaign (Optional)
If you already have Google Ads campaigns, Microsoft Advertising allows you to import these directly into your new account, making setup quicker and easier.
Choose to import from Google Ads: Follow the prompts in Microsoft Advertising to link your Google Ads account and import your campaigns.
Step 3. Set Up Your Campaigns
If you’re not importing your campaigns from Google Ads, you’ll need to create a new campaign in Microsoft Advertising.
- Create a new campaign: Select the type of campaign you want to run (e.g., search ads, display ads).
- Choose your campaign goals: Options might include conversions, website visits, or brand awareness.
- Set your targeting options: Choose locations, languages, and the demographic profiles of the audience you want to reach.
Step 4. Create Your Ad Groups and Ads
Within each campaign, you can create multiple ad groups. Each ad group can contain a set of ads and related keywords.
- Create ad groups: Organize your ad groups around a theme or product type.
- Add keywords: Include the keywords that are relevant to the ads in your ad group. Microsoft Advertising also offers keyword suggestions based on your website and existing ads.
- Write your ads: Create compelling ads with clear calls to action. Make sure your ads comply with Microsoft Advertising policies.
Step 5. Choose Your Bidding Strategy
Decide how you want to bid for ad placements. Microsoft Advertising offers several bidding options, including manual bidding (you set the bid amounts) and automated bidding (Microsoft sets bids to meet your goals).
What is Google Performance Max (PMAX)?
PMAX is an AI-based advertising platform that automates campaigns across Google’s different advertising avenues, including Search, Shopping, and other services. The key difference between Search campaigns with and without PMAX is keyword selection. With manual campaigns, you select individual keywords, whereas under PMAX, you select up to 25 themes reflecting your product line.
The Google algorithm will then automatically target promising keywords and adjust your campaign to get good results. According to Google, advertisers who rely on Performance Max get 18% more conversions on average, with similar costs.
How to Set Up Google PMAX Campaigns
Performance Max is now the default type of campaign that Google presents to new users. If you don’t select more types of campaigns at the “Choose Goal” page, you will automatically head to the “Add Search Themes” page. This replaces the “Select Keywords” phase with a simpler, more abstract process of selecting up to 25 themes that match your products.
After setting up themes, launching a PMAX is the same as a Google Search campaign. You proceed with creating ads, setting your bid strategy, and allocating your budget.
What Are Google Shopping Ads?
Google Shopping Ads, also known as Product Listing Ads (PLAs), appear in Google Search results and on Google Shopping when someone searches for products that are similar to those you sell. These ads are particularly effective because they show users a photo of your product, its price, and your store’s name. This is much more gripping than purely text-based ads and can play a large part in capturing immediate buyer interest and enhancing click-through rates, ultimately driving more traffic and sales to your website.
How to Set Up Shopping Ads
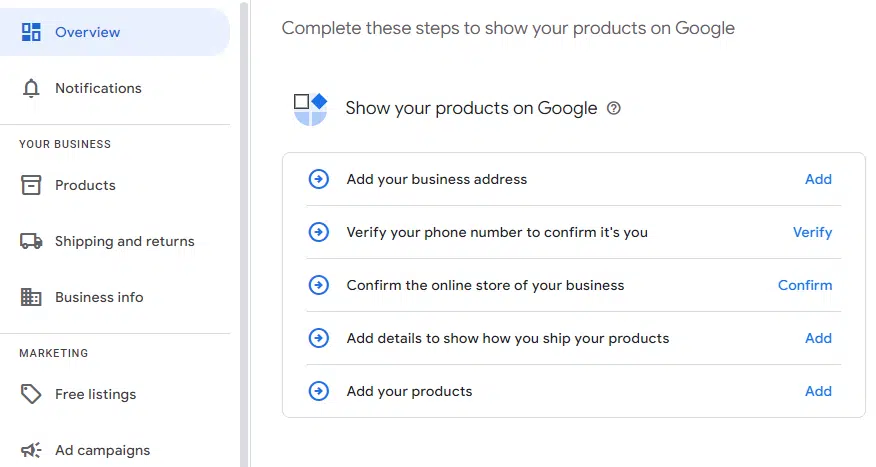
The first two steps in setting up Google Shopping Ads are setting up a Google Merchant account and loading product feeds. A product feed is a spreadsheet that provides prices, images, and descriptions for your products.
Product feeds are spreadsheets that cover key information for your products, such as their prices and images. This provides Google Ads the data necessary to know which customers are viewing which ads so that it can generate and promote relevant ads to customers on websites across Google’s network. Normally, you have to create product feeds manually. However, RevolutionParts users can use our integrations with Google Merchant Center to upload product feeds automatically.
In addition to setting up product feeds, you’ll need to link Google Merchant Center to your Google Ads. After navigating to “Create a New Campaign” in your Google Ads account, you’ll be able to launch a Google Shopping Campaign. Alternatively, you can use Google Performance Max to run them automatically.
Maximize Your Reach by Harnessing Paid Advertising for Your Parts Business
As we’ve explored setting up and fine-tuning PPC ads on Google and Microsoft platforms, it’s clear that these tools are key to increasing your business’s visibility and conversions. For parts sellers, getting to know these platforms can really boost their digital advertising efforts, helping them meet their business goals and connect with their audience.
Remember, setting up your ads is just the start. It’s important to monitor your campaigns, experimenting and tweaking based on the data. This helps keep your advertising effective and ensures you get good value for your money. Use what you learn to bring in the right kind of traffic and grow your business.
Did you know that when you sign up for RevolutionParts, you can become eligible to add on marketing services? The RevoutionParts Marketing Agency is a team of digital marketers specializing in parts marketing. This means they know all the strategies and tricks to ensure your parts web store performs at its best.
